Thursday, June 27, 2013

The BEST Chocolate Chip Cookies EVER

It's been awhile hasn't it? Sorry. Life...laziness get's in the way a lot.

I have been busy, don't you worry. Let's see. I've been getting things organized for next school year's dance team and color guard, I'm still teaching preschool yoga and dance classes, Nissa and I have been baking our butts off--we had three graduation orders for the same day, 240 cookies and 120 cake pops--I got a new job at Michael's, aaaaannnd I think that's it! Busy busy right?

Well I have sweet post for you today! The title does not lie. These are the greatest cookies I've ever made/tasted. I've been making them for about a year now, and I have FINALLY gotten them to perfection.


The recipe is actually from the great Jacque Torres (don't know him? Look him up. Greatness). The recipe is a bit complex but totally worth it. It also makes a TON of cookies. If you use a small disher it makes about 100 cookies. Now I know what you're thinking. What in God's name am I going to do with 100 of the BEST chocolate chip cookies EVER? Well I'll tell you. You're going to eat them, and you're going to enjoy every damn minute of it. Are we all in agreement? Okay, moving on.

The recipe calls for things like cake flour and bread flour and special kinds of chocolate, and you can totally substitute all purpose flour and Nestle chocolate chips, but it will not be the same cookie. You kind of have to prepare your day knowing that these cookies take time if you want them done well. I'm this way with all recipes. If I feel like I'm going to be rushed to make something, I won't make it. It always turns out poorly. Patience is something you should have a lot of when baking.

So here we go!

As Ree Drummond, my favorite Food Network cook/blogger, says: here's our cast of characters!


2 cups minus 2 tablespoons cake flour

1 2/3 cups bread flour

1 1/2 teaspoons baking powder

1 1/4 teaspoons baking soda

1 1/2 teaspoons coarse salt

2 1/2 sticks (1 1/4 cups) unsalted butter, room temperature--take the time to do this, it needs to be soft

1 1/4 cups light brown sugar, packed

1 cup plus 2 tablespoons granulated sugar

2 large eggs, room temperature

2 teaspoons pure vanilla extract

1 1/3 pounds chocolate--I use Baker's, Guittard, and Ghirardelli
Sea salt for sprinkling

One of the great things about this recipe is that you can find all of these ingredients at Walmart. Cake flour was something I thought I'd have to order online or something, but it's totally at Walmart! All of the chocolate is there too. If you can afford to shell out a little extra for the Guittard and Ghirardelli do it. Like I'll keep saying, it's totally worth it.

Okay, first step is to sift all of the dry ingredients into a large bowl and set aside.


Next we cream the butter and both sugars together. This is where I think a lot of people skimp in their cookie making; I know I did. A lot of baking recipes will state that you should cream the butter and sugar together until light and fluffy. This stage should take 3-5 minutes. I don't think I ever beat my butter and sugar together that long, but it is crucial that you do. Creaming creates air bubbles so the cookies will be lighter and rise more evenly.

This is where most people would stop in the creaming process:


I would totally say this is light and fluffy, but you'll see the difference between this and properly creamed butter and sugar in a minute. You can't exactly over mix in this step. The butter could separate, but you'd reeeeaaaaallllly have to beat it. The only stage in baking where you can over mix is when you add the flour, but we'll get to that later. Here's what properly creamed butter and sugar looks like:


The mixture will have grown in size a bit, and if you stir it, you won't feel as much grittiness from the sugar.

Once you've creamed the butter and sugars add the eggs one at a time. After each egg is beaten in, scrape down the sides of the bowl.

Then add the vanilla. Mix that all together until everything is evenly incorporated.


Creamy, light, and fluffy. Onward!

Here's where I got a little anal about the recipe. All you have to do is gradually add the dry ingredients and mix until it's JUST incorporated. However, I wanted to NAIL this recipe. So I sifted the dry ingredients AGAIN into the creamed mixture instead of just dumping it in.


By no means is this step necessary. I just wanted to get a really smooth dough.

Here's where I said you could potentially over mix your dough. Mix the dry ingredients into the wet until you almost can't see the flour. I stop mixing by machine (hand held or stand) when I can just see ribbons of flour in the dough, then I mix the rest by hand.

It's a little hard to see, but flour is still dusting the dough.

When flour is added to wet ingredients, gluten is created. This is what gives baked goods their structure. If gluten is over mixed it becomes tough. No one likes a tough cookie. ;-]


Next it's time for the chocolate!!!!!! Here's the types and amounts I use:


5oz of Baker's Semi-Sweet baking squares
One 10oz bag of Ghirardelli 60% cacao chips
Half a 11.5oz bag of Guittard milk chocolate chips

Chop all of these up and throw them in the batter!


The 60% cacao chips are a little big for my liking. I thought they were smaller so I just dumped the bag in, oops. I'd chop them smaller next time, but bigger chunks never hurt anyone...in a cookie at least.

Mix the chips in gently by hand. In a Kitchenaid bowl this got a little tough on the wrist, but I have tendinitis so I have a bit of a handicap when mixing. Anywho, you can transfer the dough to a larger bowl if you need to. Make sure it's all evenly incorporated! You want chips in every bite!


Speaking of chips!!! I totally fooled you! You thought this was just going to be a normal chocolate chip recipe didn't you! Well I have a surprise for you!


We're going to try a new addition to the BEST chocolate chip cookies EVER.

I LOVE sweet and salty. If you aren't a fan, then scroll down until you see the Tower of Pisa :-]


Kettle chips are by far my favorite kind of chip. So thick, so crunchy, so salty, SO GOOD! These potato chips are really dangerous. My mom and I actually don't allow ourselves to buy them because we can eat the whole bag in one sitting. I thought that buying them would be okay this time because I wouldn't eat them all in one sitting. In this instance, half of the bag was...going in...a cookie...anyway...

I split my batter in half...ish..and mixed in crushed up potato chips until it looked like I had enough. Next time I'll definitely add more, and I think I'll put whole chips in and let the mixing process crush them. The finished product didn't have as much saltiness as I would have like.

A shameless plug of my trip to Italy :-]

For those of you who would only like sweet cookies, welcome back!

After mixing in our chips, chocolate or otherwise, it's time to wrap the dough and refrigerate. This step really is necessary. It allows the gluten in the dough to relax a bit. We don't want that gluten to get overworked! No tough cookies!!!


I let my dough sit in the fridge for about an hour. If it gets too cold it's really difficult to scoop it.

It's time for my favorite tool! The disher! I used a #50 for these cookies, but use whatever size you'd like. Like I said, with a tiny disher you'll get about 100 cookies. With the #50 I got 78.

I had no idea where the number was until now.

Scoop out the dough onto a cookie sheet but don't press them down. Let them stay in little mounds. You can sprinkle the cookies with a little sea salt if you'd like, but that can definitely be omitted.


Bake at 350 for 10 minutes! If you've made your cookies larger, then just add a few more minutes of baking.


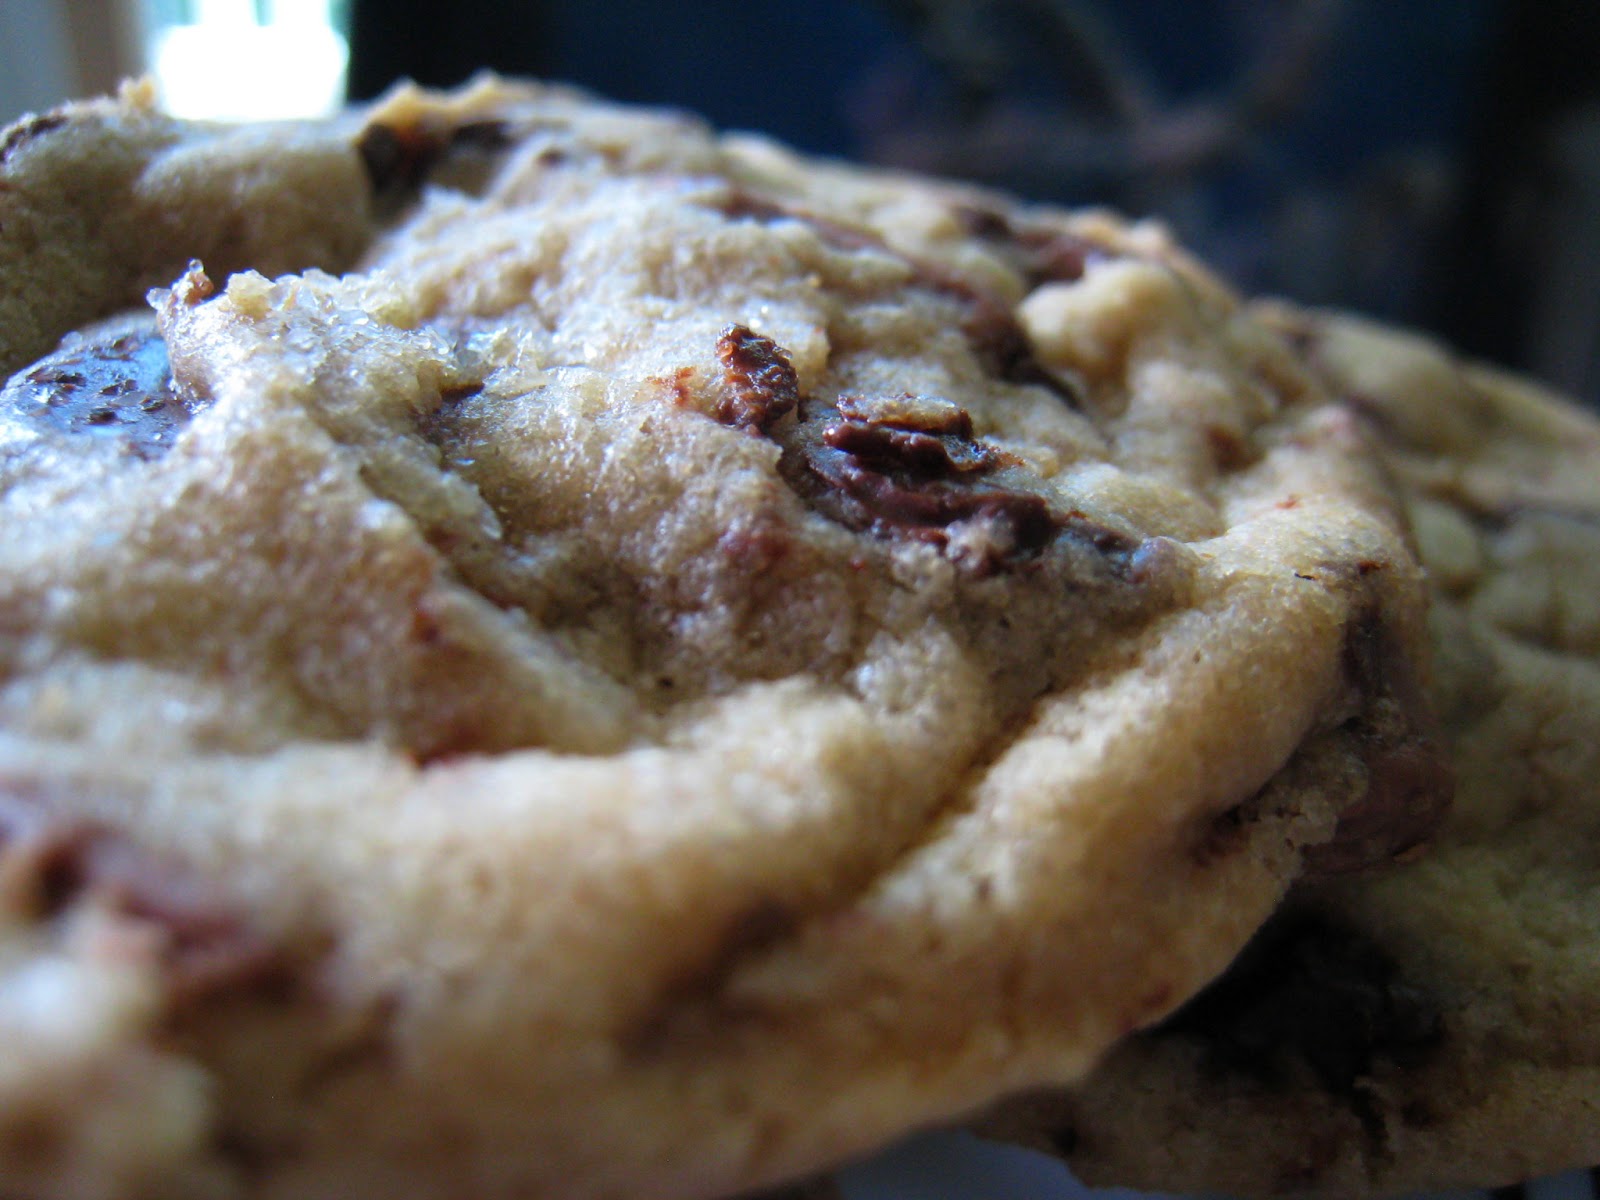
Delicious! Loaded with chocolate (and potato chips!), ooey and gooey, what more could you ask for in the BEST chocolate chip cookie EVER? Not much. Enjoy responsibly!


The BEST Chocolate Chip Cookies EVER
Ingredients:
2 cups minus 2 tablespoons cake flour

1 2/3 cups bread flour

1 1/2 teaspoons baking powder

1 1/4 teaspoons baking soda

1 1/2 teaspoons coarse salt

2 1/2 sticks (1 1/4 cups) unsalted butter, room temperature

1 1/4 cups light brown sugar, packed

1 cup plus 2 tablespoons granulated sugar

2 large eggs, room temperature

2 teaspoons pure vanilla extract

1 1/3 pounds chocolate

sea salt or fleur de sel, for sprinkling

1. Sift together the cake flour, bread flour, baking soda, baking powder, and salt into a medium sized bowl and set aside.

2. In the bowl of your mixer, cream together your butter and sugars until light and fluffy, about 3-5 minutes. Add in the eggs, one at a time, until combined, scraping down the bowl as needed. Add in the vanilla and mix.

3.Gradually add in the dry ingredients, until just moistened. Fold in your chocolate until evenly added throughout the dough. Wrap dough in plastic wrap and refrigerate for about an hour.

4. When you are ready to bake, preheat the oven to 350. Scoop the dough onto a baking sheet. Do not press the dough down – let it stay the way it is. Sprinkle the cookies lightly with a bit of fleur de sel or sea salt. Bake 10-12 minutes for smaller cookies (mine took about 11 minutes), or 18-20 minutes for larger cookies.

5. Allow the cookies to cool slightly on your baking sheet, then move them to another surface to cool completely. You can enjoy these warm, room temperature, or cold. Store in an air-tight container at room temperature for up to 3 days, or freeze for up to 2 months.

Wednesday, April 24, 2013

Edible Book Fest

Hello again! I've got a sweet post for you today, and I don't awesome (even though it is an awesome post)! I am so excited to share this one with you; I cannot believe how well this project turned out!

My man's mom works at our local library, and she informed me that they were holding an Edible Book Fest. All you had to do was make some kind of reference to a book, and it had to be edible. Simple! Nibs was on it! I'm in the middle of reading Harry Potter (again), and I thought it would be fun to do something from those books. We decided to do a cake because that's what we're familiar with, but it didn't have to be that extravagant (come on, go big or go home).  Some kind of stack of spell books was our first idea, but after some research we settled on The Monster Book of Monsters from the third Harry Potter book. Nissa was going to be out of town a couple days before the contest so she and I brainstormed before she left, and I prepared myself to foot it alone!

The process was surprisingly easy! It obviously took a lot of work, but everything worked out pretty much how I planned. There was one hiccup with an icing tip that I wanted to try, but the alternative worked out better in my opinion. The cake had to be edible, but it was not going to be eaten...so I used boxed cake. I know! I know! For shame right? Whatevs, no one was going to eat it. With the boxed cake I also used fondant, canned frosting, edible modeling dough, and homemade buttercream. That's it! The whole process probably took about 3 hours. And guess what? We won Best Team with it! Here's some process shots and the finished product.


If you have questions about any aspects of the cake or the process just let me know! Check out our Nibs page on facebook too!

Wednesday, April 17, 2013

Progresso Bacon Mac and Cheese

I'm all about getting excited over a meal I'm planning. Even if it's really simple. That take-out fake-out I made for my man and his friends? I was sittin' on that for days. Each day I was like "I can't wait for the guys to come over so I can make them food!" I love food.

On Monday I decided to make my favorite mac and cheese recipe for Tuesday night's dinner. Because I only had a day to be excited as opposed to four, I had to get excited a lot more often. I kept asking my roommates "Are you excited for dinner tomorrow?!" When I woke up the next morning, I reminded Aaron that mac and cheese was for dinner, twice, in the 10 minutes I see him before he leaves for work. Needless to say, I was excited. And the thing is, I know there are better mac and cheese recipes out there. This one just happens to be the first one I tried, and it's easy and delicious.

Have you seen the Progresso Recipe Starters commercial? It's the woman roasting a tomato on her counter with a little blow torch, and then another woman pops up and yells "Fire bad!"? Yeah, I hate that commercial. Hate it. BUT! I came across the product in the store and was intrigued after reading the label.


This is the recipe from a different can. I threw the label of the other can away before I could take a picture.

There are five different types of sauces, and each has its own recipe on the side. Well, it's more of a shopping list on the side. The actual recipe is under the label that you peel off.

I've tried a few, but the Creamy Three Cheese is my favorite. I follow the recipe to an extent, but I've made some adjustments with each time that I've made it. So here you go!

Progresso Bacon Mac and Cheese

1 can Progresso Recipe Starter: Creamy Three Cheese
1 lb of Large Elbow Macaroni
          *You can use whatever pasta you like, it's about 3-4 cups
1/2 cup Milk
1/4 tsp Garlic Salt
5 oz Sharp Cheddar Cheese
3-4 oz Pepper Jack Cheese
Bacon

First I must tell you that I tried a new way to cook bacon. I guess it's not really new, but new to me. Line a baking sheet with foil, put bacon in one layer on sheet, place in oven THEN preheat to 400 degrees, cook for 17 minutes. PERFECT bacon.


Okay, so once the bacon is done, leave the oven on. It needs to be at 400 degrees anyway. Next boil a large pot of water for your pasta. I say large because I made the mistake of using a somewhat medium saucepan, which I normally use for this recipe. HOWEVER, I made a split decision to change my recipe from 3 cups of pasta to the whole box. You need a bigger pot if you're going to do a 1 pound box of pasta. Just over estimate and you'll be fine.

While the water is boiling, shred your cheese. The original recipe calls for 6 oz of sharp cheddar and 2 oz of...cheese loaf.........................ew. As long as you have about 8 oz of whatever kind of cheese you like (you can add more for a cheesier mac), you're good to go.


Depending on how fast of a grater you are, your water could be boiling by now. If not, no worries. Just chill until the water is a-bubblin.

When the water has come to a boil, add the pasta. Cook it for 6 minutes, right to al dente because it's going to cook in the oven too.

While the pasta is going, bring the can of Progresso, milk, and garlic salt to a boil. As soon as it's boiling, remove it from the heat, add the cheese, and stir until it's melted.

The lighting in our kitchen blows
Whenever the pasta is done during the process, just drain it. If you're not done stirring the cheese in or something, no worries. Just drain the pasta and let it sit until it's ready to be put in the sauce. 

Once the pasta is drained and the cheese is melted in the sauce, it's time for bacon! You can chop it once it's out of the oven, but I like to let mine set for a bit to firm up.


As soon as I began chopping, I said to myself "This is NOT enough bacon". This is why I didn't specify the amount of bacon use should use. I cooked 7 half slices (I cut my bacon in half so it fits in my little frying pan), but whatever amount of bacon tickles your fancy is always the right amount.

Throw those tasty morsels into the cheese sauce, and then douse those noodles with that creamy goodness. Ya like that? 


Again, because I underestimated the size of my cooking vessel, I had to transfer the noodles to a large bowl before I added the sauce. 

Mix it all up! I absolutely LOVE the sound of noodles swirling around in creamy, cheesey deliciousness. Just stop and listen to that music. It's a kind of gross at the same time.

Here's where you can change up the process. You can bake this in a large casserole dish, but I received little ramekins for Christmas, and they are the only thing I use for this recipe. That way they're individualized too! Whichever you choose, spray it with cooking spray, pour the mac and cheese in, and bake for 20 minutes!

I use three because I'm cooking for three. Whatever is leftover I put in a tupperware to bake later.

You can add breadcrumbs to the top, but it's a hit or miss for me in terms of flavor. I think I'm going to leave them off the next time I make this. 


How delicious does that look?! I'm really not one for crusty noodles on top, but it's so awesome digging through that barrier to get to the molten, ooey, gooey treasure underneath! Because of the pepper jack cheese, this does have a bit of a kick, but it's more of a little baby kick not a full on kick in the face.

Something else, this dish reheats really well. I HATE reheated mac and cheese...but mainly when it came out of a blue box...so I was really happy when these leftovers turned out almost as good as the first round.

Also, throwback! How many of you basically ran Code Red through an IV when you were a kid? And aren't these Coke glasses cute!


Well I really hope you try this recipe or any of the other Progresso Recipe Starters! They really are great. And the recipes on the can aren't the only things you can make with them! Check out their site for more ideas.

Thursday, April 11, 2013

My Trip to Italy

Well, I did it. I did the impossible...in my opinion. I went overseas without my parents and spent ten days in beautiful Italy.

If you've read my other posts, you know how close I am to my family and how much I hate to be away from home. Well, for a long time my aunt--who is beyond amazing--has wanted to take my sister and I on a trip overseas. She finally decided to take us to Italy. She had taken a tour a couple of years ago and loved it so much that she wanted us to experience it.

We knew it was going to happen for some time, but over Christmas she gave us a finalized date. As that date came closer, I grew more and more anxious. As much as I hate being away from home, I hate flying even more. I'm not afraid of the normal things like crashing. I'm afraid of being locked inside a vessel that I can't stop if I need to. If something happens when I'm on a car ride, the car can stop and the side of the road is right there. Not so much on a plane. Knowing that the flight would be eight hours didn't help either.

Now that I'm back home (the flight back was better than the way there), I actually miss being in Italy. We had an unbelievable time, and even though I made sure to appreciate what I was doing and seeing while I was there, I still feel like it was just a dream. When we first got back I told myself that I wouldn't take that long of a flight again, that it wasn't worth it. We had three flights to get home, so I think that was part of it. Now that it's been almost two weeks, I think my body has done that pregnancy thing where it produces a chemical that makes you forget how awful the experience was (the flights), and I really want to go back haha!

So here is just a BIT of what we experienced!

Beautiful hotel in Venice.

The Doge's Palace. Essentially a courthouse.

Outside St. Mark's Cathedral.

Streets that look real sketch, but all of Venice looks like this and it's very safe.

Grand Canal.

These were everywhere!

Gondola ride with live music!


A beautiful vineyard where we had lunch. This was on the way to Florence.

Oscar!

Pisa.


Leaning Tower.


Our hotel in Florence. That was some amazing pizza.

Just one side of St. Mary's Cathedral.

The replica of Michelangelo's David. The original is breathtaking.

Inside St. Mary's.

Fantastic gelato.

View of Florence.

Basilica of St. Francis.

Inside St. Francis'

Colosseum in Rome.


Where chariot races and Olympic games were held.

A sculpture in Vatican City that represents the dawning of a new world.

Every inch of that ceiling is painted. No sculpture at all.


Inside the Sistine Chapel. You're not technically supposed to take photos...oops.

St. Peter's Square getting ready for Easter.

Inside St. Peter's. It was amazing.


A Pringles dispenser!

Trevi Fountain.


That's some good cheese.


Streets of Pompei.

The bed of a...freelance...prostitute.

Not everyone spoke the same language. So the brothel in Pompei worked like a McDonald's. Just point at what you want!

Bakery.

This was a "sign" that pointed to the brothel.

Temple of Apollo.

A pizza vending machine in Sorrento!


This was only 10 euros.


Beautiful staircase in our hotel in Sorrento.
That's Mt. Vesuvius in the background.